Simply Delicious : Focus On Recipes

The Best Lasagna in the World

The Best Lasagna in the World

A chef-level recipe with deep ragù, silky béchamel, and perfect layering stability.

Ingredients
  

Ragù (meat sauce)
  • 500 g ground beef 80% lean is ideal
  • 200 g Italian sausage optional but highly recommended
  • 2 tbsp olive oil extra virgin, premium if possible
  • 1 large onion 150 g, finely diced
  • 2 medium carrots 120 g, finely diced
  • 2 celery stalks 100 g, finely diced
  • 4 garlic cloves minced
  • 150 ml dry red wine optional but crucial for depth
  • 800 g canned tomatoes
  • Best: San Marzano DOP
  • High-quality Indonesia alternative: Cirio / Mutti peeled tomatoes
  • 2 tbsp tomato paste
  • 1 tsp sugar to balance acidity
  • 1 tsp dried oregano
  • 1 tsp dried basil
  • 1 bay leaf
  • ½ tsp ground nutmeg
  • Salt and black pepper to taste
Béchamel Sauce
  • 60 g unsalted butter
  • 60 g all-purpose flour
  • 700 ml whole milk
  • ¼ tsp nutmeg
  • ½ tsp salt
  • White pepper to taste
  • Optional luxury upgrade: 40 g grated Parmigiano Reggiano stirred in at the end
Cheese Layer
  • 350 g mozzarella low-moisture
  • Indonesian alternative: Greenfields mozzarella block
  • 150 g Parmigiano Reggiano best or Grana Padano (second best)
  • 250 g ricotta
  • Indonesian substitute: 200 g sour cream + 50 g Greek yogurt excellent replacement
  • 1 egg to bind ricotta
  • Pinch of salt & pepper

Method
 

Step A — Make the Ragù (2 to 2.5 hours)
  1. Aromatics base
  2. Heat 2 tbsp olive oil in a heavy pot over medium heat.
  3. Add onion, carrot, and celery. Cook 8–10 minutes until sweet and soft.
  4. Chef tip: properly softened vegetables give natural sweetness—no shortcuts.
  5. Add garlic
  6. Cook 1 minute until fragrant.
  7. Brown the meat
  8. Add beef and sausage. Break apart.
  9. Cook 10–12 minutes until well-browned (not grey).
  10. Browning = the key to deep flavor.
  11. Deglaze
  12. Pour in red wine. Scrape the bottom of the pot.
  13. Reduce liquid for 3–4 minutes.
  14. Add tomatoes & seasoning
  15. Add canned tomatoes, tomato paste, sugar, herbs, bay leaf, nutmeg, S&P.
  16. Slow simmer
  17. Reduce to low heat.
  18. Simmer uncovered for 2 hours, stirring occasionally.
  19. Add 50–100 ml water only if too thick.
  20. Goal: dense, rich, spoon-standing ragù.
Step B — Make the Béchamel (15 minutes)
  1. Melt butter over medium heat.
  2. Add flour and whisk 2 minutes (no browning).
  3. Slowly add milk, whisking constantly.
  4. Cook 6–7 minutes until thick, smooth, glossy.
  5. Season with nutmeg, salt, white pepper.
  6. Optional: Stir in 40 g Parmigiano for deeper flavor.
Step C — Prepare Cheese Mixture
  1. Mix:
  2. Ricotta (or sour cream+yogurt)
  3. 1 egg
  4. Salt & pepper
  5. 30 g Parmigiano
  6. Stir until creamy.
Step D — Layer the Lasagna (20 minutes)
  1. Preheat oven to 180°C.
  2. Base layer
  3. Thin spread of ragù. Prevents sticking.
  4. Layer 1
  5. Lasagna sheets
  6. Thick layer ragù
  7. Thin drizzle béchamel
  8. Dollops of ricotta mixture
  9. Sprinkle mozzarella
  10. Light Parmigiano
  11. Repeat 2–3 more layers.
  12. Final top layer
  13. Béchamel
  14. Mozzarella
  15. Parmigiano
  16. Press layers lightly with a spatula.
Step E — Baking
  1. Cover with foil (not touching cheese).
  2. Bake 30 minutes at 180°C.
  3. Remove foil.
  4. Bake 15–20 minutes more until golden.
  5. Optional: Broil 2 minutes for restaurant-style browning.
  6. Rest 15 minutes before slicing.
  7. The rest sets the structure—do not skip.

Notes

5. Troubleshooting Guide
Problem: Watery lasagna
Ragù wasn’t reduced long enough.
Mozzarella had too much water.
Béchamel too thin.
Pasta sheets not absorbing enough—use no-boil sheets.
Problem: Burnt top
Add foil.
Move tray to lower rack.
Problem: Dry noodles
Not enough béchamel.
Ragù too thick without enough moisture.
Problem: Bland flavor
Brown meat more deeply.
Add salt at each stage.
Choose better canned tomatoes.
Problem: Cheese separation
Do not use fresh mozzarella.
Do not overbake.
Problem: Pale top
End with 1–2 minutes broil.
6. Fine-Dining Presentation
Cut a perfect square using a hot knife (dip in hot water).
Plate on a warm white plate.
Add a spoon of extra ragù or béchamel on the side.
Garnish with:
Micro basil
A thin Parmigiano crisp
A drizzle of high-quality olive oil
Serve with a small salad: rocket + lemon + olive oil.
Gluten-Free Fresh Pasta (No Wheat, No Tapioca)

Gluten-Free Fresh Pasta (No Wheat, No Tapioca)

This gluten-free pasta dough is designed to behave like traditional pasta without using wheat or tapioca. The combination of rice flour, cornstarch, and finely ground psyllium husk creates a smooth, flexible dough that rolls thin without cracking. Once cooked, the pasta has a light chew and clean texture, making it perfect for lasagna sheets, tagliatelle, or simple noodles. It is reliable, easy to handle, and ideal for everyday home cooking.
Prep Time 20 minutes
Cook Time 3 minutes
Resting time 10 minutes
Total Time 35 minutes
Servings: 3
Course: Pasta
Cuisine: Gluten-free, Italian

Ingredients
  

  • 150 gr white rice flour
  • 75 gr cornstarch
  • 1.5 tbsp psyllium husk powder (mesh 60, fine)
  • 2 eggs
  • 1 tbsp olive oil
  • 0.75 tsp salt
  • 155 ml warm water

Method
 

  1. In a large bowl, combine rice flour, cornstarch, psyllium, and salt. Mix thoroughly so the psyllium is evenly distributed.
  2. Add eggs and olive oil. Slowly pour in warm water while mixing until a dough forms.
  3. Let the dough rest for 10 minutes. This allows the psyllium to fully hydrate and develop structure.
  4. Place the dough between two sheets of baking paper. Roll it out very thin, about 1–2 mm.
  5. Cut into your preferred pasta shape
  6. Bring a pot of salted water to a boil.
    Fresh pasta cooks in 1–3 minutes. Remove when tender with a slight bite

Notes

Key Tips

  • Use mesh 60 psyllium for best results
  • Roll thinner than you think for proper texture
  • Add a little water if the dough cracks
  • Dust lightly with rice flour if sticky
  • Use enough sauce when serving, gluten-free pasta absorbs more moisture
    Tip text

Perfect Juicy Chicken Breast

Perfect Juicy Chicken Breast

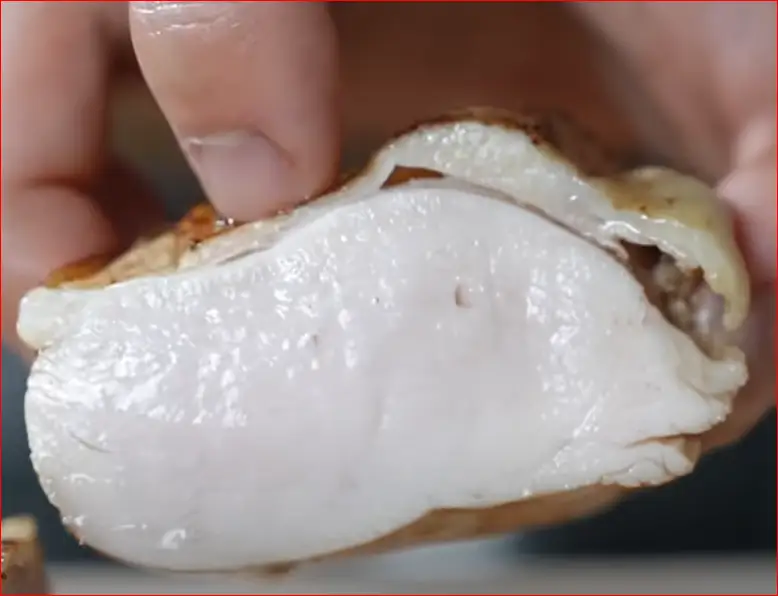
Moist, tender chicken breast infused with flavor, lightly aromatic from the veggie broth, with crispy golden skin and a buttery finish.
Prep Time 20 minutes
Cook Time 40 minutes
Total Time 1 hour
Servings: 2 people
Course: Main Course
Cuisine: French

Ingredients
  

  • 1 chicken breast
  • 30 gr salt
  • 10–15 gr sugar
  • 600 water
  • Olive oil
  • 1–2 tbsp butter
  • 1 small onion chopped
  • 1 carrot chopped
  • 1 celery stalk (optional) chopped
  • 1 bay leaf
  • A pinch of dried rosemary
  • Ice water (for chilling)

Method
 

Step 1: Prep the Chicken
  1. Pat the chicken breast dry with paper towels.
  2. Optional: soak it in 50°C water for 20–30 seconds to remove any odor, then chill briefly in ice water and pat dry.
  3. Trim off the tenderloin and any thick tendons. Even out thickness slightly if needed.
  4. Poke a few holes in the skin with a fork to prevent shrinking.
  5. Sprinkle 10–15 g sugar evenly over the surface. Let sit a few minutes, then pat off the moisture that comes out.
Step 2: Brine the Chicken
  1. Dissolve 30 g salt in 600 ml water to make a brine.
  2. Place chicken in the brine. Either:
    - Room temp: 30 min (warm weather) or 2–3 hrs (cold weather).
    - Or refrigerate overnight.
  3. Remove chicken, pat dry.
Step 3: Make the Veggie Broth
  1. Add onion, carrot (and celery if using) to a pot with cold water, enough to cover.
  2. Slowly bring to a boil, add salt, bay leaf, and rosemary.
  3. Simmer gently for 30 minutes, skimming off scum.
Step 4: Simmer the Chicken
  1. Place a rack in the pot so chicken doesn’t touch the bottom.
  2. Add chicken to the hot broth (very low simmer).
  3. Cook gently for 10 minutes.
  4. Remove, unwrap if using paper, and pat dry.
Step 5: Pan-Sear with Butter
  1. Heat a pan on high. Add 1–2 tbsp butter (let it brown slightly).
  2. Add chicken skin-side down.
  3. Reduce to medium-low and baste with foaming butter while searing.
  4. Flip occasionally, but focus on crisping the skin. Cook about 1–1.5 minutes per side.
  5. heck doneness with a thermometer (should be 74°C / 165°F) or metal skewer test (hot to the touch after 8 seconds).
Step 6: Serve
  1. Slice chicken. The inside should be juicy with a faint blush, not raw.
  2. Serve with pan juices or a light side dish.


See all recipes »